Thursday, 4 July 2013
2013-07-04 Completed code...
At the end of this post is the completed code. load into the Arduino IDE, add in the Nunchuk Library, compile it and download it.
I would like to add
There are 2 analogue INPUTs on analogue pins 4 & 5 on the Arduino.
Each of the 3 analogue outputs go the data pin on each servo. the data pin is usually white(Futaba) or yellow (JR/spektrum/others).
The servo negative (-VE) wire goes to the GND pin on the Arduino. this wire is usuallyblack (Futaba) or brown (JR/Spektrum/others).
The servo positive (+VE) wire goes to the 5V POWER pin on the Arduino. this wire is usuallyred (Futaba) or orange (JR/Spektrum/others).
see picture below for how I wired up the Arduino to the Nunchuk. Note I cut the plug off the Nunchuk (rendering it useless for using on a Wii). You don't need to do that if you get creative with the Nunchuk plug pins.

There's debug printing in there for the serial port - switch it on (Ctrl-Shift-M) and you can see what it's reading from your Nunchuk.
Note that the Nunchuck analogue pots jitter around centre. playing with DEADBAND makes it less sensitive (try a value of 2 or 3 and you'll see what I mean). Also you may find your servo endpoints/centre aren't exactly the same. play with the library servo code to work out what yours are.
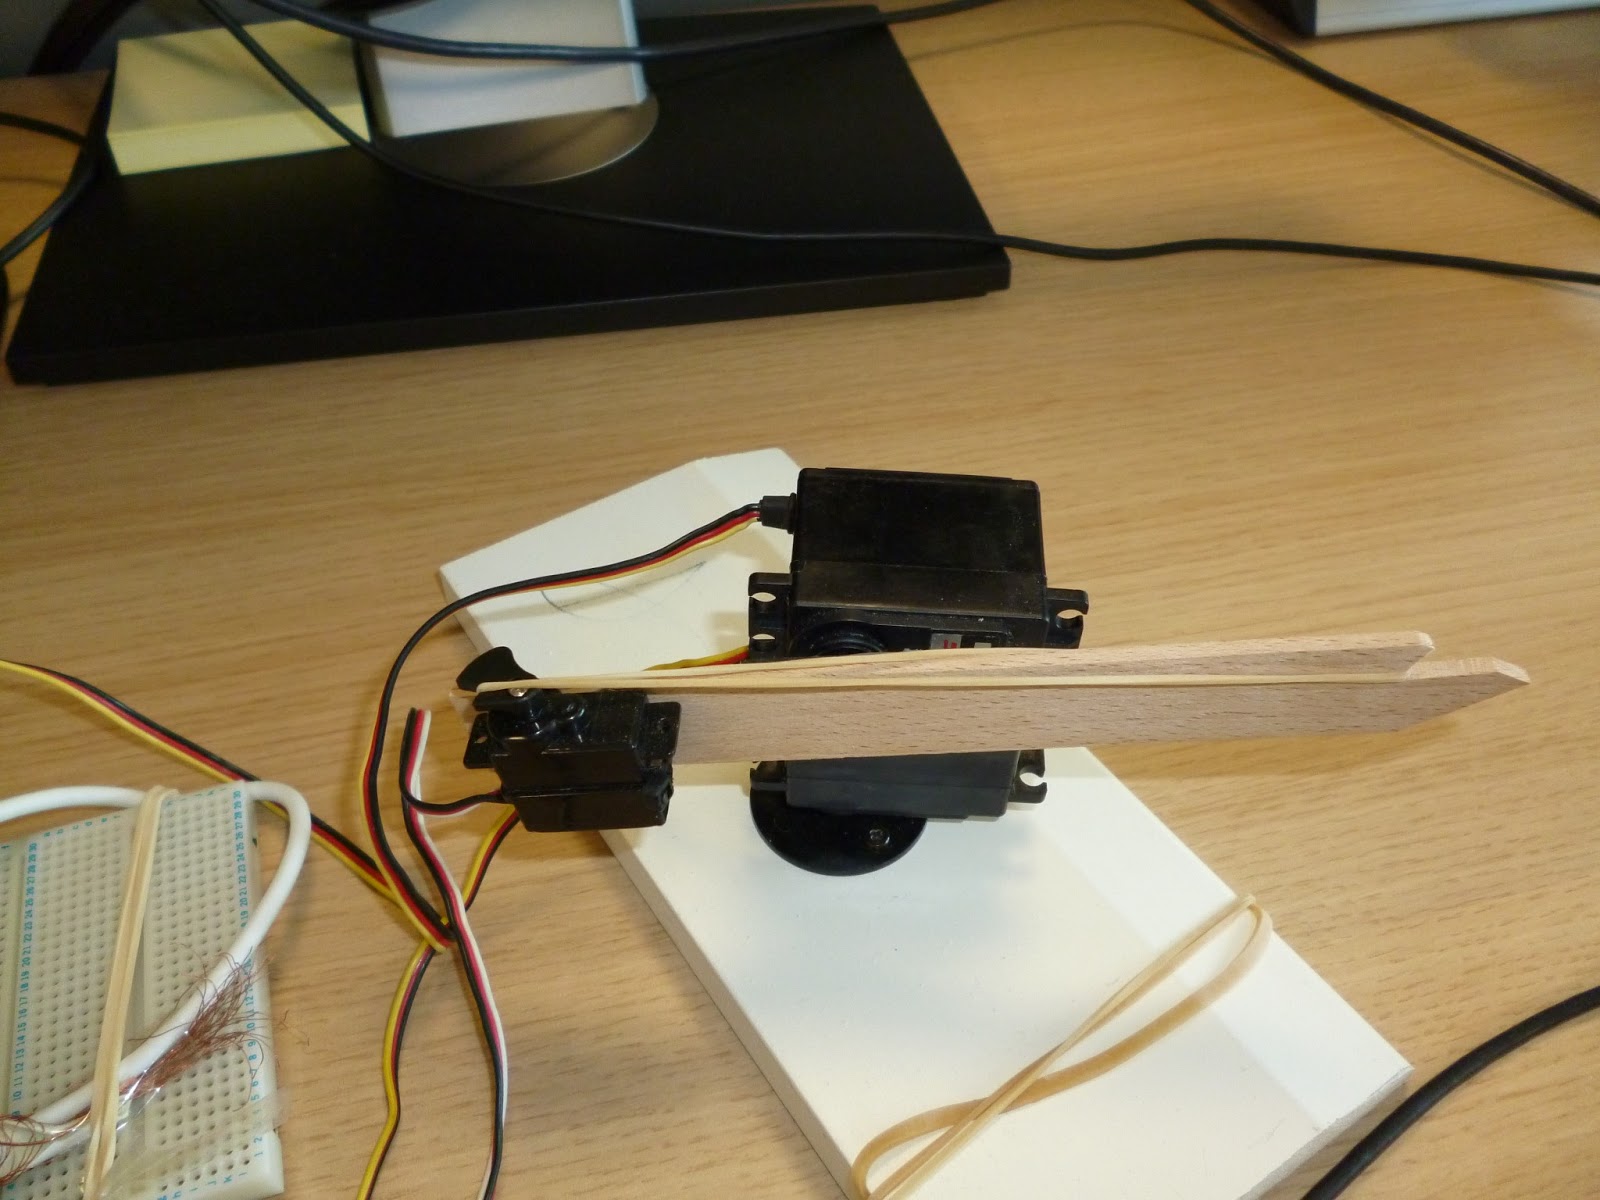
The servos can be configured as shown in the picture below (or get creative and make something that looks cool!). I just glued the servos together with hot melt glue then screwed the output disk of the Azimuth servo to a spare 8" piece of skirting board ('cos I'm cheap!)
Once complete, you can make cardboard cut-outs of your favourite office 'oxygen thief' and gun the mutha down!
THE CODE
#include <Wire.h>
#include <ArduinoNunchuk.h>
#include <Servo.h>
#define BAUDRATE 19200
#define DEADBAND 40
#define X_MIN 29
#define X_CTR 130
#define X_MAX 227
#define Y_MIN 41
#define Y_CTR 133
#define Y_MAX 228
#define T_ARMED 140
#define T_RELEASE 0
ArduinoNunchuk nunchuk = ArduinoNunchuk();
Servo servoX;
Servo servoY;
Servo servoT;
int dbVal = DEADBAND;
boolean bFire = false;
boolean bSlomo = false;
int xOld=0,yOld=0;
int xVel=0,yVel=0;
int servoXpos=X_CTR;
int servoYpos=Y_CTR;
int servoTpos=T_ARMED;
void setup()
{
Serial.begin(BAUDRATE);
nunchuk.init();
// set servo pins to OUTPUT - default is INPUT
pinMode(0,OUTPUT);
pinMode(1,OUTPUT);
pinMode(2,OUTPUT);
servoX.attach(14); //analog pin 0
servoX.write(servoXpos); // set it to centre
servoY.attach(15); //analog pin 1
servoY.write(servoYpos); // set it to centre
servoT.attach(16); //analog pin 2
servoT.write(servoTpos); // set it to centre
}
void loop()
{
nunchuk.update();
// check SLO-MO button
if (nunchuk.cButton ==1) {
dbVal=DEADBAND * 4;
if (!bSlomo) {
bSlomo = true;
Serial.println("SLO-MO ACTIVE");
}
}
else {
dbVal= DEADBAND;
if (bSlomo) {
bSlomo = false;
Serial.println("SLO-MO OFF");
}
}
//deadband the fire button for 100ms once pressed
if (nunchuk.zButton==1) {
if (!bFire) {
bFire = true;
Serial.println("FIRE BUTTON PRESSED");
servoTpos=T_RELEASE;
}
} else {
if (bFire) {
bFire=false;
Serial.println("RELEASED FIRING BUTTON");
servoTpos=T_ARMED;
}
}
// update current X & Y velocity values
// - not co-ords but relative 'change' value for each axis
// - a 'rate of change' to feed to the servo - so the servo can move slowly or quickly
xVel = getRelativeSpeed(nunchuk.analogX, X_CTR, dbVal);
yVel = getRelativeSpeed(nunchuk.analogY, Y_CTR, dbVal);
if (xOld != xVel) {
xOld = xVel;
Serial.print("X change =");
Serial.println(xVel,DEC);
}
if (yOld != yVel) {
yOld = yVel;
Serial.print("Y change =");
Serial.println(yVel,DEC);
}
// move servo angle relative to stick input
// change += to -= to reverse servo travel direction
// slow down movements by changing divisor
servoXpos +=(xVel);
if (servoXpos<0) servoXpos=0;
if (servoXpos>180) servoXpos=180;
servoYpos +=(yVel);
if (servoYpos<0) servoYpos=0;
if (servoYpos>180) servoYpos=180;
// Serial.print("X=");
// Serial.print(xVel,DEC);
// Serial.print("Y=");
// Serial.println(yVel,DEC);
//update servo position
servoX.write(servoXpos);
servoY.write(servoYpos);
servoT.write(servoTpos);
}
int getRelativeSpeed(int absVal, int axisCentre, int deadbandValue) {
// return a centred-relative positional value with optional deadband/resolution
return ((absVal - axisCentre)/deadbandValue);
}
I would like to add
- SLO-MO fine control by holding the C button.
- a delay when the trigger is pressed to ensure the servo travels to the endpoint before travelling back (pull the trigger and you'll see what I mean).
There are only 7 wires to connect to your Arduino.
There are 2 analogue INPUTs on analogue pins 4 & 5 on the Arduino.
- Pin 4 connects to the green data wire in the Nunchuk.
- Pin 5 connects to the yellow data wire in the Nunchuk.
- analogue output 0 is the Azimuth (horizontal)
- analogue output 1 is the Altitude (Vertical)
- analogue output 2 is the Trigger
Each of the 3 analogue outputs go the data pin on each servo. the data pin is usually white(Futaba) or yellow (JR/spektrum/others).
The servo negative (-VE) wire goes to the GND pin on the Arduino. this wire is usuallyblack (Futaba) or brown (JR/Spektrum/others).
The servo positive (+VE) wire goes to the 5V POWER pin on the Arduino. this wire is usuallyred (Futaba) or orange (JR/Spektrum/others).
see picture below for how I wired up the Arduino to the Nunchuk. Note I cut the plug off the Nunchuk (rendering it useless for using on a Wii). You don't need to do that if you get creative with the Nunchuk plug pins.
There's debug printing in there for the serial port - switch it on (Ctrl-Shift-M) and you can see what it's reading from your Nunchuk.
Note that the Nunchuck analogue pots jitter around centre. playing with DEADBAND makes it less sensitive (try a value of 2 or 3 and you'll see what I mean). Also you may find your servo endpoints/centre aren't exactly the same. play with the library servo code to work out what yours are.
The servos can be configured as shown in the picture below (or get creative and make something that looks cool!). I just glued the servos together with hot melt glue then screwed the output disk of the Azimuth servo to a spare 8" piece of skirting board ('cos I'm cheap!)
Once complete, you can make cardboard cut-outs of your favourite office 'oxygen thief' and gun the mutha down!
THE CODE
#include <Wire.h>
#include <ArduinoNunchuk.h>
#include <Servo.h>
#define BAUDRATE 19200
#define DEADBAND 40
#define X_MIN 29
#define X_CTR 130
#define X_MAX 227
#define Y_MIN 41
#define Y_CTR 133
#define Y_MAX 228
#define T_ARMED 140
#define T_RELEASE 0
ArduinoNunchuk nunchuk = ArduinoNunchuk();
Servo servoX;
Servo servoY;
Servo servoT;
int dbVal = DEADBAND;
boolean bFire = false;
boolean bSlomo = false;
int xOld=0,yOld=0;
int xVel=0,yVel=0;
int servoXpos=X_CTR;
int servoYpos=Y_CTR;
int servoTpos=T_ARMED;
void setup()
{
Serial.begin(BAUDRATE);
nunchuk.init();
// set servo pins to OUTPUT - default is INPUT
pinMode(0,OUTPUT);
pinMode(1,OUTPUT);
pinMode(2,OUTPUT);
servoX.attach(14); //analog pin 0
servoX.write(servoXpos); // set it to centre
servoY.attach(15); //analog pin 1
servoY.write(servoYpos); // set it to centre
servoT.attach(16); //analog pin 2
servoT.write(servoTpos); // set it to centre
}
void loop()
{
nunchuk.update();
// check SLO-MO button
if (nunchuk.cButton ==1) {
dbVal=DEADBAND * 4;
if (!bSlomo) {
bSlomo = true;
Serial.println("SLO-MO ACTIVE");
}
}
else {
dbVal= DEADBAND;
if (bSlomo) {
bSlomo = false;
Serial.println("SLO-MO OFF");
}
}
//deadband the fire button for 100ms once pressed
if (nunchuk.zButton==1) {
if (!bFire) {
bFire = true;
Serial.println("FIRE BUTTON PRESSED");
servoTpos=T_RELEASE;
}
} else {
if (bFire) {
bFire=false;
Serial.println("RELEASED FIRING BUTTON");
servoTpos=T_ARMED;
}
}
// update current X & Y velocity values
// - not co-ords but relative 'change' value for each axis
// - a 'rate of change' to feed to the servo - so the servo can move slowly or quickly
xVel = getRelativeSpeed(nunchuk.analogX, X_CTR, dbVal);
yVel = getRelativeSpeed(nunchuk.analogY, Y_CTR, dbVal);
if (xOld != xVel) {
xOld = xVel;
Serial.print("X change =");
Serial.println(xVel,DEC);
}
if (yOld != yVel) {
yOld = yVel;
Serial.print("Y change =");
Serial.println(yVel,DEC);
}
// move servo angle relative to stick input
// change += to -= to reverse servo travel direction
// slow down movements by changing divisor
servoXpos +=(xVel);
if (servoXpos<0) servoXpos=0;
if (servoXpos>180) servoXpos=180;
servoYpos +=(yVel);
if (servoYpos<0) servoYpos=0;
if (servoYpos>180) servoYpos=180;
// Serial.print("X=");
// Serial.print(xVel,DEC);
// Serial.print("Y=");
// Serial.println(yVel,DEC);
//update servo position
servoX.write(servoXpos);
servoY.write(servoYpos);
servoT.write(servoTpos);
}
int getRelativeSpeed(int absVal, int axisCentre, int deadbandValue) {
// return a centred-relative positional value with optional deadband/resolution
return ((absVal - axisCentre)/deadbandValue);
}
The day after the last post, my house got flooded :(
A year later we're back in and I hope to complete this code and add a trigger control.
Then I'll build a rubber band gun and fit the servos to it.
A year later we're back in and I hope to complete this code and add a trigger control.
Then I'll build a rubber band gun and fit the servos to it.
code looks like
plug standard R/C servos in using analog ports 0 and 1
#include <Wire.h>
#include <ArduinoNunchuk.h>
#include <Servo.h>
#define BAUDRATE 19200
#define DEADBAND 5
#define X_MIN 29
#define X_CTR 130
#define X_MAX 227
#define Y_MIN 41
#define Y_CTR 133
#define Y_MAX 228
ArduinoNunchuk nunchuk = ArduinoNunchuk();
Servo servoX;
Servo servoY;
int dbVal = DEADBAND;
boolean bFire = false;
int xOld=0,yOld=0;
int xVel=0,yVel=0;
int servoXpos=90;
int servoYpos=90;
void setup()
{
Serial.begin(BAUDRATE);
nunchuk.init();
pinMode(1,OUTPUT);
servoX.attach(14); //analog pin 0
servoX.write(servoXpos); // set it to centre
servoY.attach(15); //analog pin 1
servoY.write(servoYpos); // set it to centre
}
void loop()
{
nunchuk.update();
// check SLO-MO button
if (nunchuk.cButton ==1)
dbVal=DEADBAND * 4;
else
dbVal= DEADBAND;
//deadband the fire button for 100ms once pressed
if (nunchuk.zButton==1) {
if (!bFire) {
bFire = true;
Serial.println("FIRE BUTTON PRESSED");
}
} else {
if (bFire) {
bFire=false;
Serial.println("RELEASED FIRING BUTTON");
}
}
// update current X & Y velocity values
// - not co-ords but relative 'change' value for each axis
// - a 'rate of change' to feed to the servo - so the servo can move slowly or quickly
xVel = getRelativeSpeed(nunchuk.analogX, X_CTR, dbVal);
yVel = getRelativeSpeed(nunchuk.analogY, Y_CTR, dbVal);
if (xOld != xVel) {
xOld = xVel;
Serial.print("X change =");
Serial.println(xVel,DEC);
}
if (yOld != yVel) {
yOld = yVel;
Serial.print("Y change =");
Serial.println(yVel,DEC);
}
// move servo angle relative to stick input
servoXpos -=xVel;
if (servoXpos<0) servoXpos=0;
if (servoXpos>180) servoXpos=180;
servoYpos -=yVel;
if (servoYpos<0) servoYpos=0;
if (servoYpos>180) servoYpos=180;
//update servo position
servoX.write(servoXpos);
servoY.write(servoYpos);
}
int getRelativeSpeed(int absVal, int axisCentre, int deadbandValue) {
// return a centred-relative positional value with optional deadband/resolution
return ((absVal - axisCentre)/deadbandValue);
}
plug standard R/C servos in using analog ports 0 and 1
there are 4 wires on a nunchuk
RED - 3v (Arduino is 5, but hopefully the tolerances of components is high :^)
WHITE - Ground
YELLOW - DATA
GREEN - DATA
wire up RED to the 5v arduino supply
wire up WHITE to GND
wire up YELLOW to ANALOG IN 5
wire up GREEN to ANALOG IN 4
job done
it should look like the picture below (excuse the jump wires - too impatient to solder the fine wires on the Nunchuk)

the idea is that the code produces a relative rate of change arounf the analogue stick centres. X &Y values range from roughly -20 to + 20
Holding the C button reduces that relative change by a factor of 4 (-5 to +5)
the code latches the button on/off events and deadbands the actual X & Y coordinates to prevent the values jittering.
the next step will be to build a 2-axis servo rig to translate the stick movement into a sort of RA/Dec movement in a couple of servos.
a third servo will move off the Z button value
The point of all this...?
To fill up the lunchtime void and make a 'Wii Nunchuk'-driven 2-axis Elastic Band Gun! so I can hit Malcy when he gets cheeky.
#include <Wire.h>
#include <ArduinoNunchuk.h>
#define BAUDRATE 19200
#define DEADBAND 5
#define X_MIN 29
#define X_CTR 130
#define X_MAX 227
#define Y_MIN 41
#define Y_CTR 133
#define Y_MAX 228
ArduinoNunchuk nunchuk = ArduinoNunchuk();
int dbVal = DEADBAND;
boolean bFire = false;
int xOld=0,yOld=0;
int xVel=0,yVel=0;
void setup()
{
Serial.begin(BAUDRATE);
nunchuk.init();
}
void loop()
{
nunchuk.update();
// check SLO-MO button
if (nunchuk.cButton ==1)
dbVal=DEADBAND * 4;
else
dbVal= DEADBAND;
//deadband the fire button for 100ms once pressed
if (nunchuk.zButton==1) {
if (!bFire) {
bFire = true;
Serial.println("FIRE BUTTON PRESSED");
}
} else {
if (bFire) {
bFire=false;
Serial.println("RELEASED FIRING BUTTON");
}
}
// update current X & Y velocity values
// - not co-ords but relative 'change' value for each axis
// - a 'rate of change' to feed to the servo - so the servo can move slowly or quickly
xVel = getRelativeSpeed(nunchuk.analogX, X_CTR, dbVal);
yVel = getRelativeSpeed(nunchuk.analogY, Y_CTR, dbVal);
if (xOld != xVel) {
xOld = xVel;
Serial.print("X change =");
Serial.println(xVel,DEC);
}
if (yOld != yVel) {
yOld = yVel;
Serial.print("Y change =");
Serial.println(yVel,DEC);
}
}
int getRelativeSpeed(int absVal, int axisCentre, int deadbandValue) {
// return a centred-relative positional value with optional deadband/resolution
return ((absVal - axisCentre)/deadbandValue);
}
this blog is to document controlling servos from a Nunchuk using an Arduino
all the hard work was done by
Gabriel Bianconi
http://www.gabrielbianconi.com/
http://www.gabrielbianconi.com/projects/arduinonunchuk/
you can get a second hand nunchuk from CEX games centres for a fiver.
it has 2 buttons, a 2-axis analogue stick and 3 accelerometers(!) - for a fiver!!!
this blog is just a dumping ground for the information - feel free to use and improve.
No comments:
Post a Comment